Some mornings ask for calm, even when your calendar looks loud, and that’s exactly why I keep Magic Shell Keto Overnight Oats in my back pocket. First, you get that deep, chocolaty “snap” when your spoon breaks through the thin shell. Then, you hit the cool, creamy layer underneath—soft, lightly sweet, and surprisingly filling without feeling heavy.
Because you build it the night before, you also wake up to a breakfast that already loves you back. It tastes like a treat, yet it still shows up with steady energy, gentle sweetness, and enough texture to keep you interested all the way to the bottom of the jar. I reach for it most on early workdays, after a walk when I want something cold and satisfying, or on slow weekends when I want brunch energy without brunch effort.
What makes this feel “Jamie Willow” is the little practical twist: I set up the shell so it turns glossy and crisp instead of streaky or gritty, and I aim for a base that stays spoon-thick even after a full night in the fridge. So, you get dessert vibes with weekday reliability—pretty, portable, and quietly comforting.
The Story
Memory and Connection
I learned the hard way that mornings don’t always wait for you to feel ready. Back when my life ran on alarms and quick decisions, I used to stand in the kitchen with one sock on, searching for something anything that felt steady. First, I’d open the fridge like it held answers. Then, I’d close it, reopen it, and somehow expect a new plan to appear.
On one of those weeks, I remember the air outside looking damp and gray, and I remember my coffee tasting sharper than usual. I also remember how my stomach felt: not exactly hungry, yet not exactly settled either. I needed something that didn’t demand much chewing, didn’t spike my appetite into a crash, and didn’t make me feel like I had already failed the day because I grabbed the “wrong” breakfast.
So, I started building little jars at night. At first, I did it for pure practicality. Then, after a few mornings of eating something that tasted like a real choice not a last resort I realized the jars gave me a tiny kind of dignity. I could walk out the door with breakfast already handled. I could sit in the car for a moment, take a bite, and feel my shoulders drop.
After that, I began treating the jar like a small ritual instead of a chore. I’d stir slowly, taste once, and adjust. I’d listen for the soft tap of the spoon on glass. Meanwhile, the kitchen would quiet down, and I could pretend the next day might run a little smoother.
The chocolate shell idea came from a craving, honestly. I wanted that crisp crack you get from a dipped ice cream bar, because it feels playful and satisfying in a way plain, creamy breakfasts sometimes don’t. Still, I wanted it to stay simple enough for a Wednesday. So, I tested it until it stopped feeling fussy. Finally, it became one of those recipes I trust when I need comfort that also behaves like a plan.
Tradition or Seasonal Relevance
Even though I didn’t grow up with “overnight jars” as a formal tradition, I did grow up with the idea that breakfast should carry you. In my family, breakfast often meant something warm and steady, especially when the weather turned. So, when autumn shows up, I lean into cinnamon, vanilla, and toasted nuts. Then, when spring arrives, I brighten things with citrus zest or a few berries on top.
The chocolate shell nods to old-school treats, yet the creamy base underneath reminds me of the cozy breakfasts that always felt like a reset. Because seasons change quickly, I like recipes that can shift with them. So, you can keep the same structure and simply rotate the flavor notes.
Key Ingredients and Tools
Ingredient Choices This recipe succeeds
because each ingredient has a job, and because the textures stack in a way that keeps every bite interesting. First, you need a creamy base. I use a thick, plain yogurt (dairy or dairy-free), because it gives you tang, body, and that spoonable richness that still feels fresh when eaten cold. Then, I add a splash of milk of your choice to loosen it just enough, because the mixture should look like a soft pudding—not a drink.
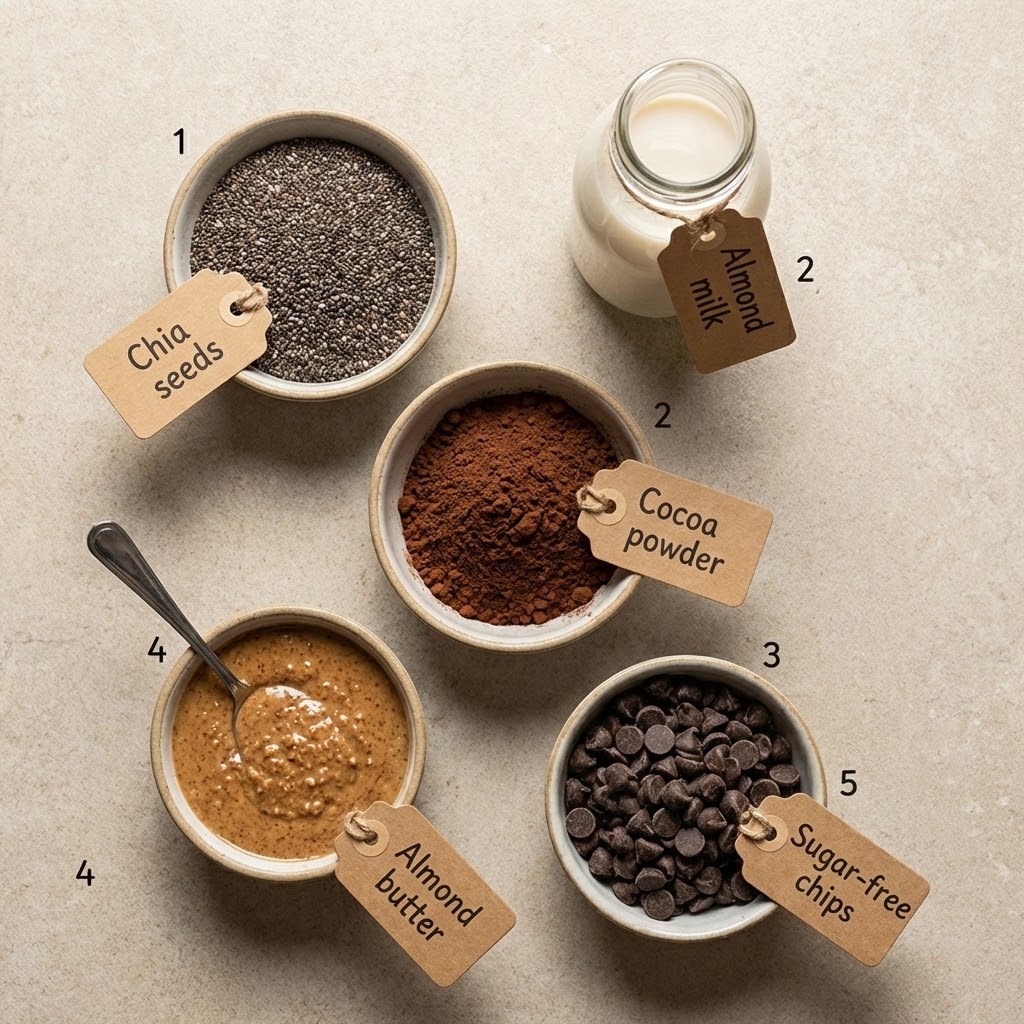
After that, you build the “overnight” texture with a combination of small, absorbent ingredients. Chia seeds matter here, because they swell and set the mixture into something scoopable. Ground flax helps too, because it thickens quietly while adding a gentle nuttiness. I also love hemp hearts for a tender bite that mimics the comfort of a classic oat-like breakfast, yet stays light and pleasantly chewy.
Next, think about sweetness. I keep it calm and clean with a sugar-free sweetener that you like the taste of, because if you dislike the sweetener, you will taste it in every bite. Then, I round it out with vanilla extract and a pinch of salt, because salt turns “sweet” into “sweet and satisfying.”
Now for the fun part: the shell. You need chocolate (chips, chunks, or a chopped bar) and a fat that turns liquid chocolate into a thin, snappy coating once chilled. I often use coconut oil for that classic crack. If you prefer a more neutral flavor, you can use deodorized coconut oil. Then, if you want the shell a little softer, you can reduce the oil slightly.
Finally, toppings do quiet magic. Chopped nuts add crunch. Unsweetened coconut adds a toasty whisper. Cocoa powder adds a dark, grown-up finish. Even a few raspberries can work if they fit your day, because the tart pop against chocolate feels bright and intentional.
Tools and Prep Essentials
You don’t need much gear, and you definitely don’t need perfection. Still, a few tools make this easier. First, use a jar or container with a lid, because you want a tight seal overnight. I like wide-mouth mason jars, since you can stir without fighting the sides. Then, if you plan to meal prep several servings, use identical jars so you can portion quickly and stack them neatly.
Next, grab a small whisk or fork, because it helps you fully blend the thick base before the seeds start absorbing. After that, use a small silicone spatula to scrape the sides, because the mixture clings and you don’t want dry pockets.
Meanwhile, for the shell, use a microwave-safe bowl or a small saucepan. If you melt chocolate gently, it stays glossy and smooth. Then, keep a tablespoon nearby, because you’ll want to drizzle and tilt the jar without making a mess.
If you want to lean into meal-prep rhythm, you can pair this recipe with a simple planning session from EasyDishGuide.com. Then, if you like jar-based breakfasts in general, this guide can help you pick the right containers and textures:
Step-by-step Instructions
Guided Steps You will make two parts
First, choose your containers. Set out two medium jars (or one larger jar) with lids. Then, make sure they’re dry, because water droplets can make melted chocolate seize later.
Next, make the creamy base. In a bowl, add: – 1 cup thick plain yogurt (dairy or dairy-free) – 1/3 cup milk of choice (start with less if your yogurt runs thin) – 2 tablespoons chia seeds – 1 tablespoon ground flax – 3 tablespoons hemp hearts – 1/2 teaspoon vanilla extract – Pinch of salt – Sweetener to taste (start small, then adjust)
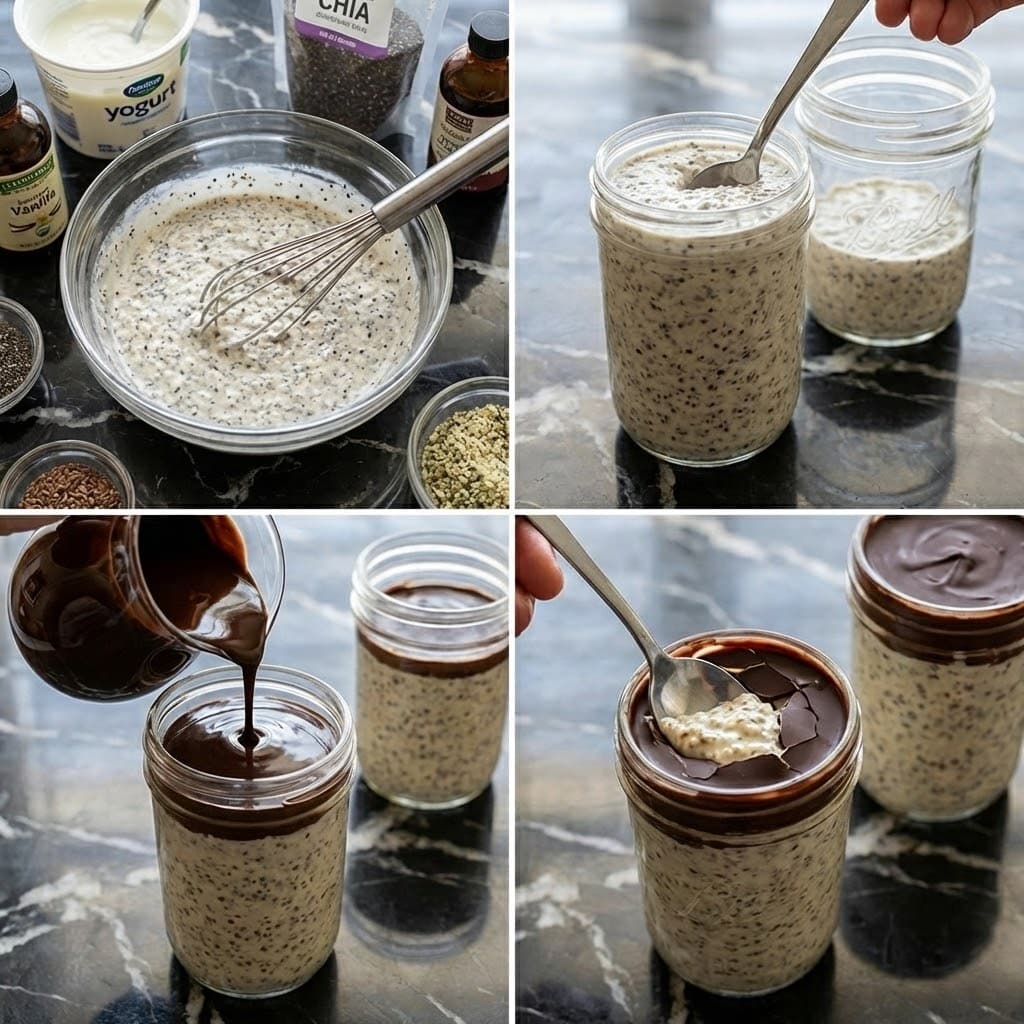
Then, whisk slowly at first, because the dry ingredients like to clump. After that, whisk a little more firmly until you see an even, speckled mixture with no dry pockets. Meanwhile, watch the texture: it should fall from the whisk in thick ribbons, not pour like a beverage.
Now, rest the mixture for 5 minutes right on the counter. This step looks small, yet it changes everything. First, the chia starts to gel. Then, the flax thickens. After that, you can judge whether the mixture needs another splash of milk.
Next, whisk again. If it looks too thick, add milk one tablespoon at a time. If it looks too thin, add another teaspoon of chia, whisk, and wait 2 minutes. Then, taste for sweetness and salt, because cold foods mute flavor.
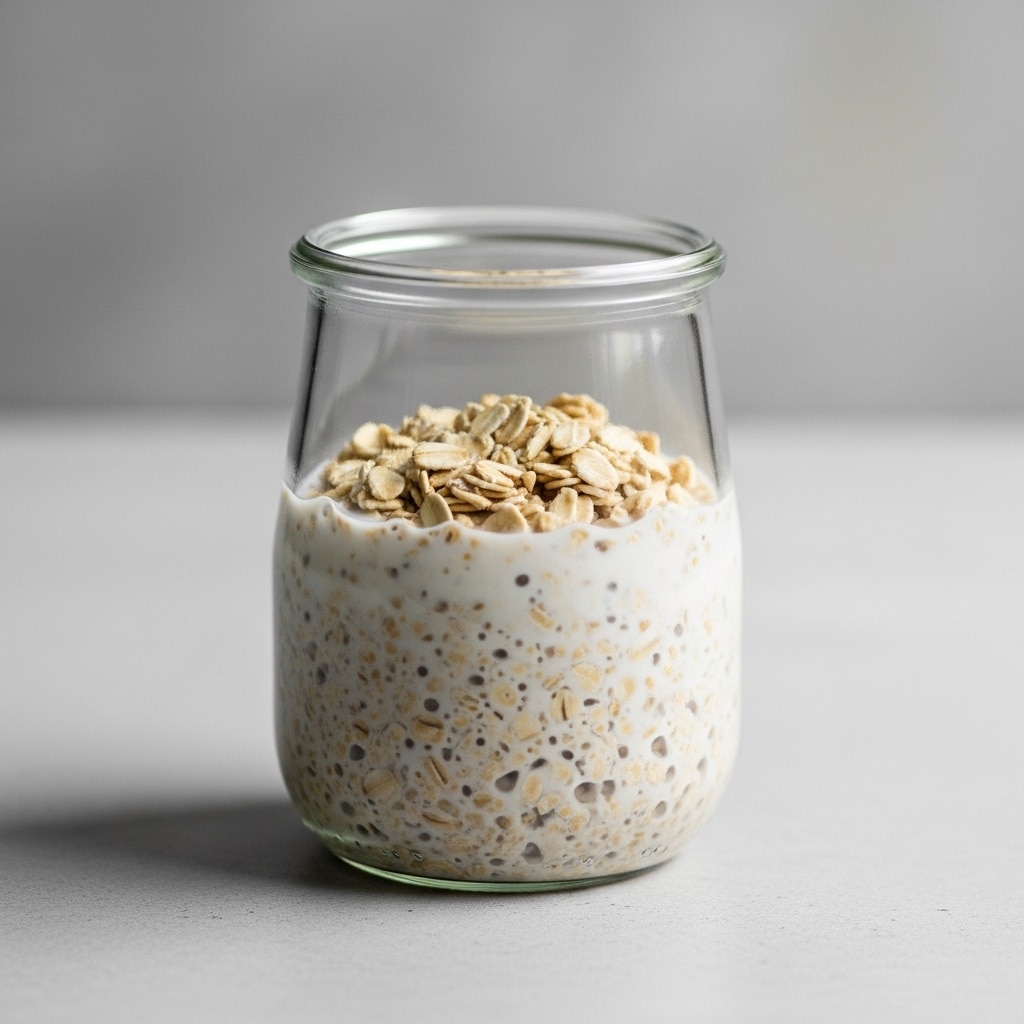
After that, portion the base into your jars. Tap each jar gently on the counter. Then, use the back of a spoon to smooth the top, because a flat surface helps the shell spread evenly later.
Now, cover and refrigerate. Chill for at least 6 hours, although overnight works best. During that time, the mixture will turn into a spoonable, pudding-like breakfast that holds its shape.
In the morning (or whenever you want the shell), melt the chocolate. Add 1/3 cup chocolate and 1 tablespoon coconut oil to a microwave-safe bowl. Then, microwave in 15–20 second bursts, stirring between each, until the chocolate turns smooth and glossy. If you use a saucepan instead, keep the heat low and stir constantly.
After that, let the chocolate cool for 2–3 minutes. This matters because piping-hot chocolate can slightly melt the top layer, which can blur the clean “shell” effect. You want it warm and fluid, not hot.
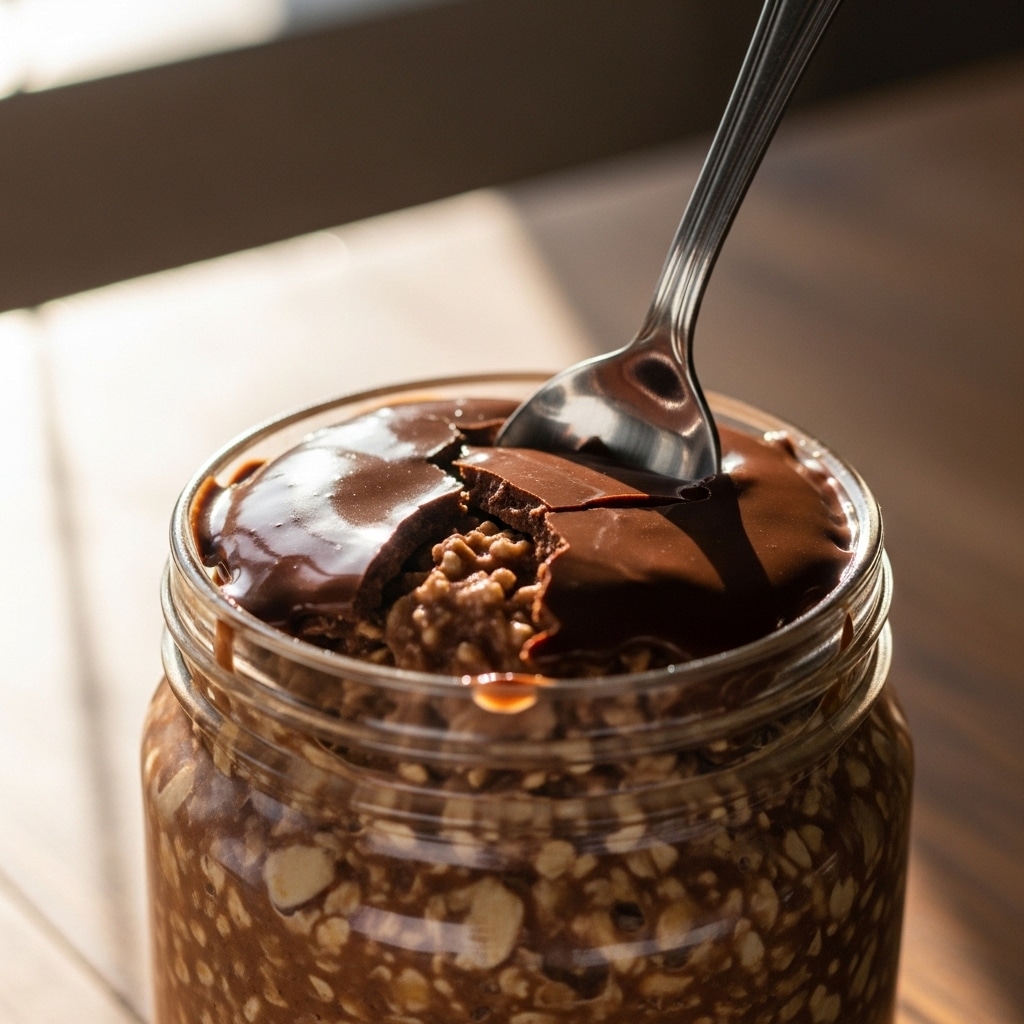
Next, pull your jars from the fridge. Stir the base just once if you want an even texture, or leave it layered if you like it extra thick underneath. Then, pour or drizzle the melted chocolate over the top—about 1 to 2 tablespoons per jar.
Now, tilt the jar gently so the chocolate slides to the edges. First, rotate it in a slow circle. Then, tip it slightly back and forth until the top looks fully coated. After that, set the jar back upright.
Finally, return the jars to the fridge for 10 minutes. Once chilled, the top will look darker and feel firm. When you crack in with a spoon, you’ll get that clean snap that makes Magic Shell Keto Overnight Oats feel like a treat you planned on purpose.
Tips and Mistakes to Avoid First
Don’t rush the thickening. If you skip the 5-minute rest before portioning, the mixture can thicken unevenly, so one jar turns perfect while the other turns loose. Instead, rest, whisk again, and then portion.
Then, watch your liquid. Yogurts vary wildly, so start with less milk and add slowly. If your mixture turns thin, it will still taste good, yet it won’t hold the shell as cleanly. After that, remember that chia keeps thickening for hours, so resist the urge to “fix” it too aggressively early on.
Next, avoid overheating the chocolate. If you microwave too long, the chocolate turns grainy or scorched. Instead, use short bursts and stir patiently. Meanwhile, keep the jar dry, because even a small drop of water can mess with melted chocolate.
Also, choose your texture on purpose. If you want it extra creamy, stir the chilled base before topping. If you want a thicker bottom and lighter top, leave it untouched and add the shell right on top.
For extra flavor without extra effort, add spice in layers. First, whisk a pinch of cinnamon into the base. Then, dust a tiny bit of cocoa powder on top right before serving, because the aroma hits your nose before the first bite.
Serving, Storage, and Variation
Serving Ideas
First, serve it straight from the fridge if you love that cold, creamy contrast with the crisp top. The shell will crack cleanly, and the base will feel almost like a mousse. Then, if you want a softer bite, let the jar sit on the counter for 5 minutes before you eat, because the chill will relax just enough to taste extra fragrant.
After that, consider the toppings. You can keep it simple with chopped almonds or walnuts, because crunch against chocolate always works. Meanwhile, if you want a more dessert-like finish, add a small spoonful of whipped cream or coconut cream right before serving, so it stays airy and distinct.
For busy weekdays, I like the “grab-and-go” approach. First, keep a spoon in your bag or car. Then, eat it during a quiet moment—before the first meeting, after school drop-off, or while the kettle warms. It feels small, yet it changes the tone of the morning.
For slow weekends, you can turn it into a layered bowl. First, crack the shell and spoon everything into a chilled dish. Then, add a few extra toppings—nuts, coconut, or a swirl of nut butter. After that, sip coffee or tea slowly and let it count as brunch, because it feels special without turning into a project.
If you want a cozy vibe in colder months, pair it with something warm. Then, the contrast becomes the point: cold, creamy bites followed by a hot mug of tea or coffee. In warmer months, it shines beside fresh fruit or a simple iced latte, because the whole breakfast feels cool and clean.

Storage & Creative Variations
First, store the base in the fridge, tightly covered, for up to 4 days. The texture will thicken slightly over time, so on day three or four you may want to stir in a small splash of milk before serving. Then, add the chocolate shell closer to eating if you want the crispest crack, because it stays snappy when it sets fresh.
If you already added the shell, you can still store the jars for a couple of days, although the top can pick up moisture from the fridge and soften slightly. It will still taste great, yet the crack may turn into more of a bend. After that, keep the lid sealed, because fridge air can dull the chocolate aroma.
I don’t recommend freezing the finished jars, because the creamy base can separate and the shell can turn streaky when thawed. If you want to prep far ahead, mix the dry ingredients in small containers and portion the yogurt separately. Then, you can combine them in minutes the night before.
For variations, start with flavor direction. First, go “deep and dark” by adding cocoa powder to the base, because it makes the whole jar taste more like a chocolate dessert. Then, balance it with an extra pinch of salt so it stays rich, not flat.
Or go “bright” by adding a little lemon or orange zest to the base. After that, top with the chocolate shell as usual, because citrus and chocolate create a clean contrast that tastes intentional.
For nut-free needs, skip nut toppings and use toasted coconut or pumpkin seeds for crunch. Then, if you avoid coconut, use a different neutral fat that sets firm when chilled, and test the ratio with a small amount first.
If you want to push it toward a savory-sweet edge, add a tiny pinch of flaky salt on top of the shell right after you pour it. Then, let it set. That little sparkle of salt makes the chocolate taste fuller, and it makes the jar feel like something from a fancy café without any extra work.
F.A.Q
Why did my breakfast jar turn runny instead of thick?
First, check your yogurt. Some brands run thin, so the same amount of milk can push the mixture too far. Then, remember that chia and flax need time, so a jar can look loose at hour two and turn perfect by morning. After that, adjust strategically: whisk in 1 teaspoon chia, wait 10 minutes, and reassess. If it still looks loose, add another teaspoon. Meanwhile, avoid adding too much liquid “just to make it stir” you want a thick, spoonable texture once chilled.
How do I keep the chocolate topping glossy instead of dull or grainy?
First, melt gently. Use short microwave bursts and stir often, or use very low heat on the stove. Then, keep every tool completely dry, because moisture can make chocolate seize and look gritty. After that, let the chocolate cool for a couple minutes before you pour it, because overheated chocolate can lose shine. Finally, chill the jar uncovered for about 5 minutes if your fridge runs humid, and then cap it, because trapped moisture can soften and dull the surface.
Can I make it dairy-free without losing creaminess?
Yes. First, choose a thick dairy-free yogurt, because the base needs body more than anything else. Then, use a dairy-free milk with a mild flavor so it doesn’t overpower the vanilla. After that, taste and adjust sweetness, since some dairy-free yogurts already contain tang or sweetness. For the topping, use dairy-free chocolate. Finally, keep the ratio of thick ingredient to liquid steady, because dairy-free yogurts vary even more in texture than dairy ones.
What’s the best way to meal prep several jars without wasting time?
First, line up your jars and add all dry ingredients to each one so you can work assembly-line style. Then, whisk the wet base in a bowl once, because that prevents uneven sweetener or clumps. After that, pour into jars, tap them down, and seal. If you want the crispest topping, melt the chocolate fresh the morning you plan to eat, because it sets at peak snap. Finally, label the lids if you change flavors, because it saves you from “mystery jar” mornings.
CONCLUSION :
A good breakfast doesn’t need to be loud to be life-changing. Sometimes it just needs to be ready, dependable, and genuinely pleasant to eat. This recipe gives you that: a creamy, spoon-thick jar that tastes calm and satisfying, plus a thin chocolate layer that cracks like a promise you kept to yourself.
First, you do a few quiet minutes of prep the night before. Then, you wake up to something that feels both practical and a little special. After that, you can keep moving out the door, into your day, back to your responsibilities without skipping the part where you get cared for too.
That’s the heart of EasyDishGuide and my own breakfast-first mission: build mornings that nourish you without demanding perfection. So, adjust the sweetness, change the toppings, and make it fit your kitchen instead of forcing your kitchen to fit a fantasy.
When you finally tap your spoon through that chilled shell, I hope Magic Shell Keto Overnight Oats reminds you that small routines can feel like comfort and that “good enough” cooking can still taste absolutely wonderful.
You May Also Like
If you love jar-based breakfasts, you might also enjoy our Chocolate Cereal Milk Overnight Oats Recipe for another rich chocolaty morning treat. For a protein-packed variation, try our Creamy Coffee Protein Overnight Oats Recipe that keeps you fueled all morning long. And if you enjoy the creamy, layered jar experience, our Low Calorie Overnight Oats for Weight Loss is another make-ahead breakfast worth exploring.